Online Link
The code for this lab can be found in my private GitHub repo: https://github.com/evade-ninja/Lab6
Objective
Modify the existing garage door sensor and actuators to implement a RESTful API. Implement an interface, and additionally a non-web browser based interface.
Materials
- 3x Wemos D1 Mini
- 1x Wemos D1 Relay Shield
- Red, Yellow, and Green LEDs
- 3x 220ohm resistors
- 1x 10kohm resistor
- 1 magnetic reed switch
- 3x breadboards
- 1 ultrasonic rangefinder model HCSR04
- A Raspberry Pi 3B+
- Postman app (for debugging POST/GET API)
- Shortcuts app
- Ubuntu Virtual Machine
Resources/References
I used quite a few resources while working on this project:
Accessing the body of a request with ESP8266:
https://techtutorialsx.com/2017/03/26/esp8266-webserver-accessing-the-body-of-a-http-request/
C Multiline String Literal:
https://stackoverflow.com/questions/1135841/c-multiline-string-literal/1135862
API token in headers: https://github.com/esp8266/Arduino/blob/4897e0006b5b0123a2fa31f67b14a3fff65ce561/libraries/ESP8266WebServer/examples/SimpleAuthentification/SimpleAuthentification.ino#L124
Getting around CORS:
HTTP Basic Authentication on ESP8266:
Setting up HAProxy: https://serversforhackers.com/c/using-ssl-certificates-with-haproxy
https://blog.sleeplessbeastie.eu/2018/03/08/how-to-define-basic-authentication-on-haproxy/
Procedures
I started by defining what my REST endpoints would be for the opener using Swagger.
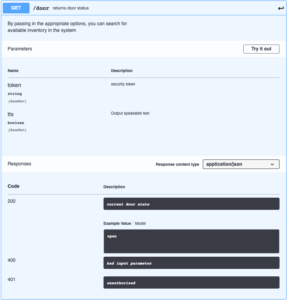
Figure 1- Door Controller (GET)
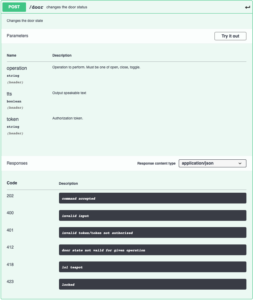
Figure 2- Door Controller (POST)
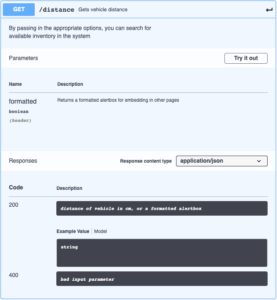
Figure 3- Distance Sensor API
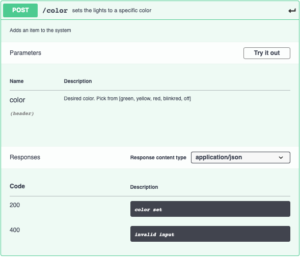
Figure 4- Lights API
I created a GET and a POST endpoint. Both accept the “token” parameter which is used to provide some simple authorization for the REST API, as well as the “tts” parameter. The tts parameter when set to true returns the output as a speakable string instead of a short easily parsable string. This is used by non-UI clients and will be discussed later. On the POST endpoint, the “operation” parameter is used to designate the desired operation. The response codes are typical response codes, with 202 being used instead of 200 to describe that the command was accepted, but that the door may not actually respond to the command. The response code of 412 indicates that the door is not able to accept a command at the current time, either because it hasn’t been long enough since the last command or because you are trying to open a door that is already open.
Once I had the swagger defined for the opener, I implemented the REST API on the device itself. I chose to implement it as a separate web server instance on the ESP8266 running on a separate port. It took a fair amount of effort to add the REST API server. The most difficult part was figuring out how to read the additional headers presented by the client.
After the REST API was in place, I set up HAProxy on an Ubuntu virtual machine. The HAProxy instance provides SSL termination as well as HTTP Basic authentication. This will be used to provide internet connectivity for non UI access to the device. I created an SSL certificate for my Home Automation server.
With the proxy in place, I used the Shortcuts app (previously Workflows) to create a shortcut that would respond to Siri commands. The shortcut makes a POST request to the HAProxy server, includes the authorization header for basic HTTP authentication, the token that the device is expecting, the operation, and the tts (true) headers. The connection is authenticated by the HAProxy server, and then passed on to the opener device. The device then returns a response in plain text that can be read aloud by the phone. This provides a simple, yet powerful interface to control many different things.
After getting the Shortcuts app to open and close the door, I continued work on the web interface. I used the web interface from the previous lab and added some jQuery to the page that obtains the distance sensor information via the REST API on the distance sensor. I also added a simple username and password authentication using HTTP Basic Authentication based on feedback from the previous lab.
Figure 5- Web Interface Screenshot
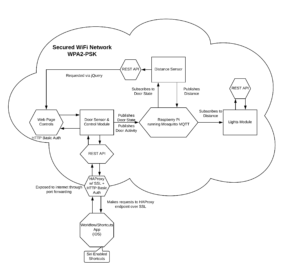
Below is a diagram of the system from this lab:
On the internal network, the system largely depends on encryption of the transport layer to protect data. The web interface hosted on the door controller is protected with HTTP basic authentication using a username and password. The simple password keeps unauthorized users on the network from accessing the controls for the garage door. Devices internally communicate over MQTT or REST.
Externally, an HAProxy is running on a virtual machine running on my home network. External devices connect to the door controller via the reverse proxy, which provides SSL encryption over the internet and an additional HTTP Basic authentication to prevent malicious users from having direct access to the device. The proxy forwards connections to the door controller only if the correct basic authentication strings are provided.
The hardware used in this lab is unchanged from the previous labs. For reference, pictures are included below:

The distance sensor, the garage door controller, and the status lights indicator.
Thought Questions
- How did you overcome the need for a full featured interface, as well as the need for an accurate and easy to use interface?
This lab is all about the magic of the API. Instead of having specific, proprietary magic strings and URLs, using a REST API makes it easy to wire things together. One doesn’t need to use a proprietary interface, or even develop an interface. With the right set of APIs, one could make use of an existing interface to tie things together – such as HomeAssistant – giving the user a single pane of glass for all their devices. - This was a challenging lab for me and took a fair amount of time. I had issues with web browsers complaining about CORS (cross origin request security) and not wanting to load content from the distance sensor, I had coding mistakes that prevented the REST webserver from working correctly, difficulty retrieving custom headers from the ESP8266WebServer, and I had a misinterpretation of the lab instructions. Also, I couldn’t figure out why I had strange WiFi access points appearing named ESP with the mac address of the devices I was using. Turns out that you have to explicitly set the station mode or the device will also act as an open access point, allowing unauthenticated connections to everything.
- I spent about 14 hours on the lab and about 1.5 hours on the report.
